
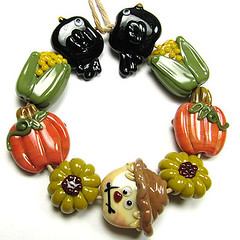
 Recently I was asked to make a turkey bead. Although I had never attempted one, how hard could it really be? After careful consideration. I decided to go with the "cutesy" version. More on the comical side. The version in my head looked so much better than it turned out at the torch. I don't think you could call this a turkey. Doesn't really look like any turkey I've ever seen. Pity, because I was really rocking the turkey form in my head. Oh well, we'll just chalk this up to the turkey Fail category!
Monday, November 23, 2009
Turkey FAIL!
Recently I was asked to make a turkey bead. Although I had never attempted one, how hard could it really be? After careful consideration. I decided to go with the "cutesy" version. More on the comical side. The version in my head looked so much better than it turned out at the torch. I don't think you could call this a turkey. Doesn't really look like any turkey I've ever seen. Pity, because I was really rocking the turkey form in my head. Oh well, we'll just chalk this up to the turkey Fail category!Friday, November 6, 2009
A day like no other
At 1:00 am Thursday morning I was awakened by my 13 year old daughter. She had ran into my bedroom saying something was wrong, I think we are having a storm. I bolted out of bed to what I thought was hail hitting our house. I would learn later it was debris. I ran to the front door and looked out to the most surreal sight. It was broad daylight in the middle of the night? Still half asleep, I couldn't understand why it was so light outside. I ran to look out the back door and my blood ran cold.
A wall of flames and the loudest sound I have ever heard. My first thought was a plane had crashed in our back yard. I began screaming for my family to get up. My husband bolts our of bed to see what was going on. We realized that the natural gas line that runs through our community has exploded!
We live 4 streets over from where this fire ball is raging out of control. The pipe line runs right next to our property but has exploded at the pumping station 3 miles from our front door.
We know we need to act fast and throw on some clothes. I tried calling 911 but the lines are jammed and I can't get through. I yell at my husband to get the kids and I run out to try to save our mules. They are going crazy with fright. I can't get them haltered no matter how hard I try. My husband is yelling at me to get into the truck. We've got to get out NOW!
We drive down the street making sure our neighbors are getting out and our friends are safe. We all make it out to the main road. Emergency crews are on the way, the sky is lit with blue and red flashes. The fire is reaching 700 feet in the air. Houses are on fire, the noise is deafening and night has been turned to day. We could feel the heat as soon as we stepped outside. A mandatory evacuation soon followed.
We made it safely to my Mother's house in town. Around 3:00 that morning, the news crew reported the fire was somewhat contained. Thinking we could get back into our home and check on the mules we were not able to take, we head back out. The emergency crews would not let us back in and directed us to the middle school, where the sheriff and fire marshal would meet with us.
All of the families displaced in our community, the red cross, sheriff, and fire marshal all congregated to the commons area in the middle school where we were told we would not be allowed back home until after day break. Safety was the main concern. El Paso Gas employees where in the process of checking all the gas lines for air pockets to ensure another explosion wouldn't happen. Fire crews had contained all of the grass fires.
Around 5:30-6:00 am we were finally allowed back home. We had a home to come home to! No damage and all animals safe. Three families where not so lucky.
The house closest to the pumping station was leveled. The three occupants sustained injuries. One was listed in satisfactory condition in our local hospital. One flown to the burn center in Lubbock and one treated and released. I have heard, by talking to others, that they'll be OK.
The house directly across from the explosion, suffered severe damage. Windows blown out, shingles melted and cars burned. Another family's vehicle was melted as well.
The amazing thing was no fatalities! God was watching over each and every one of us. It will be a long time coming before we're all OK. This was a devastating experience to say the least. But we're alive to tell the tale and that's what matters.
Local News Coverage here.
Saturday, August 15, 2009
Changing of the Season
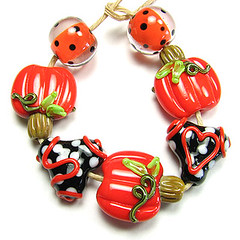
 As much as I hate to see the summer end, I am looking forward to the changing season. In anticipation of those cooler days, turning leaves, harvesting of summer crops and of course Halloween; my designs reflect the fun in Fall.
Fall has always been a favorite time for me. The excitement of returning to school. Re-acquainting with friends, sharing summer stories and adventures. Although I am long past school age, I get to live vicariously through my daughter.
In my community, the coming of fall means block parties, fall festival and all out Halloween fun.
 September brings a block party at the middle school. Hot dogs, hamburgers and ice cream shared under a shade tree. The sound of a child's laughter all around. Younger children running around playing, older one's standing around looking cool. Teenagers dancing to the music and adults showing them how it was done in their day. Much to the embarrassment of anyone over the age of 13.
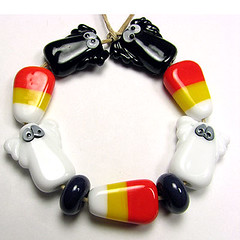 October bring Halloween. Dad's readying their trailers, outfitted with bales of hay. This is actually a completion in our neighborhood of who can decorate the best trailer. Mom's helping make the costumes perfect and stocking up on bags of candy and treats. Older siblings get the honor of passing out the candy because they are just too "old" to trick or treat anymore. Not the case with parents who are never to old to participate in the fun!
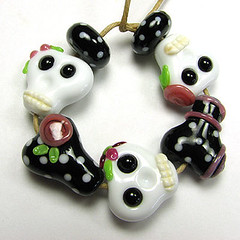
Then the convoy starts.
Kids and adults alike pile onto the trailers at one end of the neighborhood and in unison drive house to house. Kids trick or treating, while parents stand in the street and visit. Then on to the next group of houses. The great thing about living in a country community is the safety and comradery. It's not unusual to find groups of people visiting in a neighbors yard, the street closed down while children have fun running from house to house getting candy and showing off their costumes. Everyone watching out for each others kids. Happy Halloween!
Sunday, August 9, 2009
Cashmere Dreams
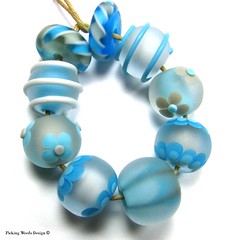
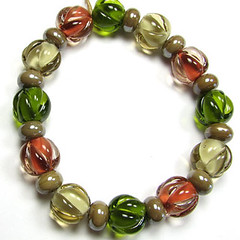 I love this set! It's a simple set. Nothing complicated in the making. Neutral colors. Easy creasing technique. But the creases give the beads such depth. I've made creased beads before but this time, I creased the glass diagonally in a zig-zag pattern and I love the end result. Spin the beads in your had and the solid color underneath the transparent encasing changes from light to dark.
I've paired some of my favorite fall colors together for this set and encased them in complimentary transparent. The green is a new olive green color from CIM (creation is messy) layered under Effetre Olive transparent. Red roof tile a gorgeous terra cotta color has been layered under transparent rose. Which tones the clay color down just a bit and gives it a rosy glow. The cream colored bead is ASK Moroccan Swirl. I wasn't impressed with this color at first but now that it is no longer in production I've discovered I love it. Go figure! I layered that under Effetra light brown, which just enhances the creaminess of the opaque color. Now the spacer really threw me for a loop. It is also a no longer in production color from ASK called Desert Chameleon? I think that the name but I could be wrong. I've used small amounts of this color before and wasn't too impressed with it at the time. That was until I reduced it in the flame. Wow! It really changed my feels towards this glass. Reducing it produces a beautiful silvery-mother of pearl shine on the surface of the bead letting the neutral tan show through.
You can stop by my Etsy store to see more pictures.
Monday, August 3, 2009
Mrs. Dalloway

Mrs Dalloway (published on 14 May 1925) is a novel by Virginia Woolf that details a day in the life of Clarissa Dalloway in post-World War I England. Mrs Dalloway continues to be one of Woolf's best-known novels.
Created from two short stories, "Mrs Dalloway in Bond Street" and the unfinished "The Prime Minister", the novel's story is of Clarissa's preparations for a party of which she is to be hostess. With the interior perspective of the novel, the story travels forwards and back in time, and in and out of the characters' minds, to construct a complete image of Clarissa's life and of the inter-war social structure. ~~ Courtesy of Wikipedia
Created from two short stories, "Mrs Dalloway in Bond Street" and the unfinished "The Prime Minister", the novel's story is of Clarissa's preparations for a party of which she is to be hostess. With the interior perspective of the novel, the story travels forwards and back in time, and in and out of the characters' minds, to construct a complete image of Clarissa's life and of the inter-war social structure. ~~ Courtesy of Wikipedia
In 1998, Michael Cunningham published a novel entitled "The hours". Four years later the movie was released, starring Meryl Streep, Nicole Kidman and Julianne Moore. I fell in love with both the book and subsequent movie.
Although I had never read the works of Virginia Woolf, my curiosity was piqued. I headed to the library and checked out all of her work. Mrs. Dalloway was the first book of hers I read. I was absolutely fascinated by her writing style. The pure poetry of her words. Her brilliance. I was completely enthralled by the story! To write a novel about one day, astounded me. How can one write a whole novel on a single day in the life of the main character?! Never once did my attention falter!
So I dedicate this set to Mrs. Dalloway and Virginia Woolf, two amazingly interesting women!
Monday, July 27, 2009
Girl Interrupted
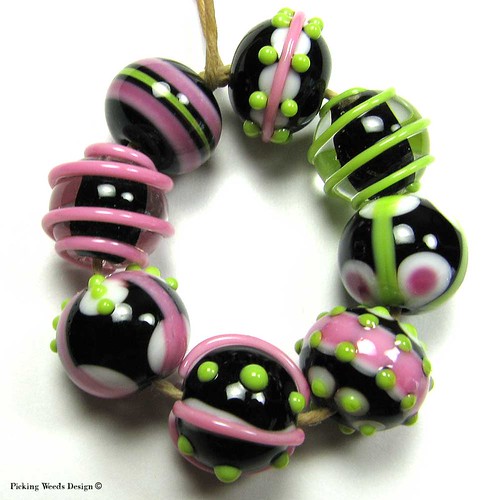
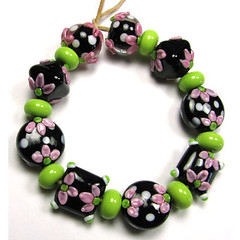 Cooler temps means I'm back in the studio. Yay! And back to my favorite color. Pink! There is just something so crisp and cool about pink, green and black. Or at least I think so. I've added little pink three petaled blooms to a black background, some with white polka dots. Just to mix it up a bit, I've included 4 different shaped beads. I'm really digging the bracelets that designers are making that include different shaped beads. No idea what they are called, cha-cha maybe? Anyway, newly listed tonight in my Etsy store.
Tuesday, July 14, 2009
Seeing Triple Digits
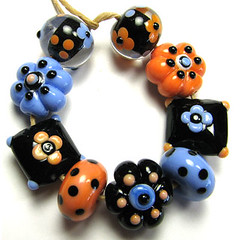 No new beads have been listed. It's just too hot to work, too hot to think. Is there relief in site? I hope so. Looking at the local weather forecast, they are calling for temps in the high 90's this week. That's a cold front! The past week and a half temps have been consistently 100-105. When you're sitting over an open flame with a kiln set at 960 at your side and high heat outside your door, you just don't have the desire to sweat it out. Once temps are a little more tolerable, I'll have new things to list.
Until then, I have Contemporary. Periwinkle and peach with black contrast. Different shapes but ranging in the same sizes. Although the picture shows a more orange tone to the peach. It's definitely peachier in real life.
Thursday, July 9, 2009
Fun and Games
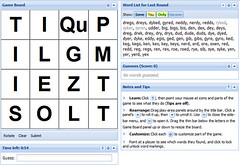
Hi my name is Terri and I'm addicted to word games. That's the first step, right? Scrabble is my all time favorite game, however my family does not like playing the board game. For a good many years, I played Wordox religiously. Then when the game was no longer available on line, I found Wordsplay. It's very similar to Boggle. You play online, against real people. I've included a screen shot of the board. The screen shot to the left is of the tiles. I cropped out the list of other players. It is a game played within your  browser. No downloading anything on your computer and best of all it's Free. I think you have to enter your email address and then choose a user name. Other than that, there's no hassle. Another game I love to play is Out of Order by Boxer Jam. Out of order is a trivia, word scramble kind of game. You earn points by unscrambling words (your given a clue) the fastest. You also lose points if answered incorrectly. You can register to play or play as a guest. I'm not really sure what the benefit of registering is because I've never checked out the other games.
browser. No downloading anything on your computer and best of all it's Free. I think you have to enter your email address and then choose a user name. Other than that, there's no hassle. Another game I love to play is Out of Order by Boxer Jam. Out of order is a trivia, word scramble kind of game. You earn points by unscrambling words (your given a clue) the fastest. You also lose points if answered incorrectly. You can register to play or play as a guest. I'm not really sure what the benefit of registering is because I've never checked out the other games. Monday, July 6, 2009
Splash
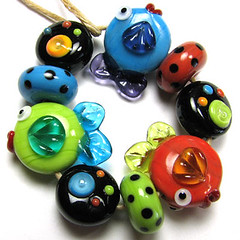
Three bold and bright fishies together with some straight-sided lentils and disks make up this eye catching set. I've used dark turquoise and transparent purple, pea green and transparent turquoise and an orangy coral and transparent yellow-green for the fishes. The straight-sided lentils have a captured bubble in the center of the biggest raised dot with little dots in all the colors I used as the body of the fishes. The three disks in turquoise, green and coral have black dot accents. Sure to make a fun and festive design.
Thursday, July 2, 2009
Daring~

Dare to be Daring......or something like that. My new goal as of late is to use bright, bold colors. I'm such a muted or pink kind of person that using bold colors is a real stretch for me. In this set I combined orange, scarlet and deep purple. I threw in silver foil and murrini for good measure with a bit of silver plum. The end result is really stunning. I just wished the picture looked as good as it does in real life. Oh and hopefully one of these days I'll get better at this blogging stuff. I do realize that my blog is quite boring. :(
Monday, June 29, 2009
Lovin' Murrini!
There are so many things you can incorporate into your bead design: dichroic, leaf and foils (copper, silver, gold, etc.), metal mesh, mica, frit, murrini......well you get the picture. I've tried some of these things in the past with mixed results and feelings. Nothing has really given me that OMG! moment. Ya' Know?
A couple of years ago I had purchased a mixed murrini sample pack off of Ebay. Gotta say I was not impressed in the least. While the chips looks pretty in the container, not so much when I used them in a bead. They bled or devitrified. No matter how I worked them. So on my shelf they sat. I wasn't too enthusiastic on trying any more.
Now I'll admit I'm a sucker for pretty packaging. A big sucker. I've purchased the most horrible tasting fudge because it came in a cute tin with a pink and green bow (my favorite colors). I've bought books that were a complete waste of paper because I liked the dust jacket. I've bought pajama's two sized too small because I liked the bag it came in. I've bought the ugliest glass because it had "pink" in the name. Where am I going with this, you ask?
Okay, I'll get to the point. A while back a fellow bead maker announced her line of Murrini. I was really tempted for a couple of reasons. The over-all presentation. I was really drawn to the pictures/packaging. The second reason? It was glass! I was also very hesitant because of my past experience and I didn't want to sink any money into something I wouldn't like.
Eventually I was tempted enough to make my first purchase and boy am I glad I did! Noting but rave reviews for this murrini and finally my OMG moment!
Renee Wiggins with Jet Age Studio has amazing murrini blends that will NOT disappoint.
 In this first set, I used her Silky Sand blend. I started with a base of Effetre Avacado thickly encased in clear. Using the murrini as the main focus of the bead, I added lines and dots in complimentary blue, green and browns.
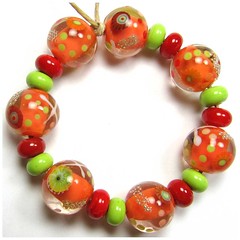 This second set features the Citron Blend. I started off with a base of Vetrofond Poppy encased in clear. Added the murrini and lines and dots in green, white, red and a bit of fine silver mesh here and there.
A couple of years ago I had purchased a mixed murrini sample pack off of Ebay. Gotta say I was not impressed in the least. While the chips looks pretty in the container, not so much when I used them in a bead. They bled or devitrified. No matter how I worked them. So on my shelf they sat. I wasn't too enthusiastic on trying any more.
Now I'll admit I'm a sucker for pretty packaging. A big sucker. I've purchased the most horrible tasting fudge because it came in a cute tin with a pink and green bow (my favorite colors). I've bought books that were a complete waste of paper because I liked the dust jacket. I've bought pajama's two sized too small because I liked the bag it came in. I've bought the ugliest glass because it had "pink" in the name. Where am I going with this, you ask?
Okay, I'll get to the point. A while back a fellow bead maker announced her line of Murrini. I was really tempted for a couple of reasons. The over-all presentation. I was really drawn to the pictures/packaging. The second reason? It was glass! I was also very hesitant because of my past experience and I didn't want to sink any money into something I wouldn't like.
Eventually I was tempted enough to make my first purchase and boy am I glad I did! Noting but rave reviews for this murrini and finally my OMG moment!
Renee Wiggins with Jet Age Studio has amazing murrini blends that will NOT disappoint.
In this first set, I used her Silky Sand blend. I started with a base of Effetre Avacado thickly encased in clear. Using the murrini as the main focus of the bead, I added lines and dots in complimentary blue, green and browns.This second set features the Citron Blend. I started off with a base of Vetrofond Poppy encased in clear. Added the murrini and lines and dots in green, white, red and a bit of fine silver mesh here and there.
Saturday, June 27, 2009
Zingiber
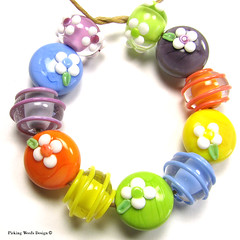
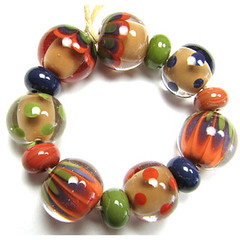 Zingiber- Gold beehive ginger is erect, from 6-8 feet tall, and the inflorescences are basal. The bracts are a golden copper color, becoming reddish as it matures, especially if it gets some full sun. All parts of the plant have a strong gingery fragrance. Attractive in the garden and as a cut flower. Blooms from July through November. Propagated by division, stem cuttings and seeds.
After awhile it get very hard to think of names for a bead set your listing. Especially for me. I seem to go into a total blank state when it comes to naming my set. Most of the time, I'm sure the name has nothing to do with the set, as with this one. During a recent google search, I came across the beautiful flowering ginger plant Zingiber. While this set looks nothing like the flower linked above, it's such a pretty flower and well the name is kind of fun to say.
I used new colors produced by Creation is Messy: Tamarind, Olive and Lapis. And a coral from Effetre. I'm not sure what the name for the coral is but it really looks like tomato soup to me. It's a nice reddish orange.
The two beads I most like in this set are the petal beads. Made using a technique taught by Amy Trescott. She makes the most amazing bead. I'm so glad she shared her technique in tutorial form.
Friday, June 26, 2009
Rainbow Sherbet

There are two things that are always at the top of our grocery list. Neapolitan ice cream and rainbow sherbet. We'll run out of toilet paper before we let our ice cream supply get low!
This set recently add to my Etsy store was inspired by the soft swirly colors of Rainbow sherbet. I've used a orangy-peachy-pink tinted version of Effetre coral as the base. Pea green and raspberry pink set off the coral so nicely.
This version of rainbow sherbet would go nice around your neck or wrist and never settles around your hips!
Thursday, June 25, 2009
Brown Bear Tutorial
Not too long ago, I ran out of propane and my regular supplier was too busy to fill my tank. Needless to say he lost my business for good. Looking in my phone book for another place to get my tank filled, that was close to my home, I found Fort RV Park. I'm so glad I did! Located in the park and where I had to go in to pay for my propane; was Lizzie Mae's. Now I'm not much of a shopper so for me to say I love a store says a lot. This place not only has great home decor, the building and fixtures are wonderful and rustic. It just a comfortable place that you can literally spend hours browsing through. Anyway, my point in telling you this, is some of the things they have for sale is black bears. Wooden, resin, ceramic...you get the picture. So I'm standing there staring at these cute little creatures and the light bulb goes on over my head. This doesn't happen very often. So I go home with my newly filled propane and set to work making a black bear in glass. I work backwards, meaning I try the hardest things first and when they fail (and fail miserably) I then simplify my work. So I thought I'd share my simplified version of a black bear in glass.

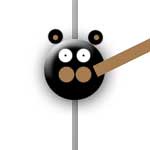
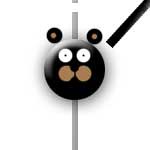
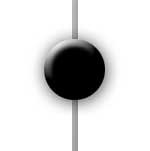
- Make a straight sided lentil with my Zoozii's press using black.
- Two dollops of glass on each side of the mandrel for ears, using black.
- Build the eyes: White pressed flat and half-way melted in. Clear left raised. Small dot of black for the pupil, melted flat.
4. Add two dollops of brown for the cheeks.
5. Add two small dots of brown on the ears.
6. Add small dot of black in the top-center of the brown cheeks for the nose.
Saturday, May 9, 2009
Where has the time gone?

A month has past with little or no update to my blog. As it turns out I am having a very difficult time maintaining business with personal life. Such a busy time for me and no relief in site. I have only manged to make it to the studio a small amount of times the past month. Usually I'm out there every day.
I'm planning to include another tutorial on making little bear beads as soon as time permits. I have managed to add some new listings to my Etsy store, so if you have a chance check them out.
Saturday, April 4, 2009
Fish Tutorial
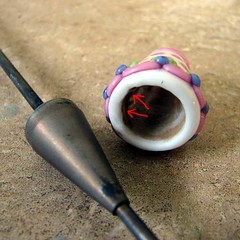
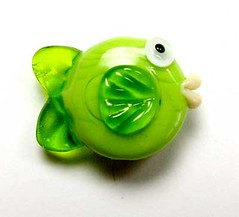 I have never been one who could put pencil to paper and draw realistic images. Even my stick people are pitiful. It is even more difficult when using glass as you do not have the erase option. Once I realised
  every thing is just basic shapes IE. circles, squares, and triangles. It was easier for me to make animals. By no means are my animals realistic but that's okay. I actually prefer to make the "cutesy" style. And by varying the eyes and mouth you can give your fish several different expressions.
In order to get a crisp round body shape. I use a glass press I purchased from Zoozii's. I like the straight sided lentil (spree) press. It creates a flattened round bead that is thick enough to decorate the sides. This will be the body of your fish. You can use either a transparent or opaque color of your choice. For the fish pictured above. I used the smallest cavity of my press, which makes a base bead of 13mm x 6mm.
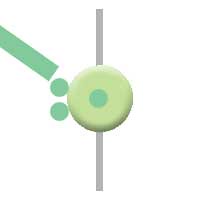 Once the body of the fish is made. I add the side fins. I use a 5-7mm sized rod and heat a small gather on the end. I place the dot off center and closer to the front. You'll need to do this on both sides of the body, making sure the dot is positioned in the same place on both sides. For the back fins, heat a gather and place one dot above center and the other below. You want these dots close together, but not touching.
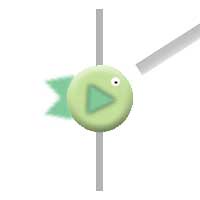 The next step is the eyes. These can be made several different ways. I prefer to layer white, clear and a dot of black for the pupil. Using a stringer place a small dot of white on both sides of the body. You can place the eyes where ever it suits you. I prefer the very edge of the body and close to the mandrel. Flatten this white dot but do not melt in. Place a small dot of clear over the white and flatten. Then place an even smaller dot of black over the clear. I push the black into the clear with a small spatula then slowly heat the eyes to round them back out, making sure not to heat them too much. You want the eyes to remained slightly raised.

Once the body of the fish is made. I add the side fins. I use a 5-7mm sized rod and heat a small gather on the end. I place the dot off center and closer to the front. You'll need to do this on both sides of the body, making sure the dot is positioned in the same place on both sides. For the back fins, heat a gather and place one dot above center and the other below. You want these dots close together, but not touching. Now you'll need to shape all of the fins. To shape the side fins on the body. I use an exacto knife to crease the raised dot down the center and then on each side. You'll want to direct your flame only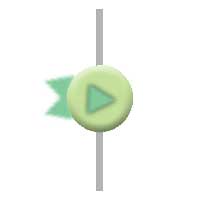 on the raised dot and not the body. We want that dot to remain raised. The final touch is pulling the front half of the fin into a point or a triangle. I use an old mandrel that I ground down to a fine point but any poking tool will work.
on the raised dot and not the body. We want that dot to remain raised. The final touch is pulling the front half of the fin into a point or a triangle. I use an old mandrel that I ground down to a fine point but any poking tool will work.To shape the back fins. I soften the glass in the flame and use tweezers to squeeze and center them up. When you squeeze the glass it will drawl the dots closer together. You can either use a stringer to pull them into points or use your tweezers to ruffle them. Either way looks good.
The next step is the eyes. These can be made several different ways. I prefer to layer white, clear and a dot of black for the pupil. Using a stringer place a small dot of white on both sides of the body. You can place the eyes where ever it suits you. I prefer the very edge of the body and close to the mandrel. Flatten this white dot but do not melt in. Place a small dot of clear over the white and flatten. Then place an even smaller dot of black over the clear. I push the black into the clear with a small spatula then slowly heat the eyes to round them back out, making sure not to heat them too much. You want the eyes to remained slightly raised.The final step is the lips. Using a stringer of your color choice, place a raised dot on the flat end of the bead. Using an exacto knife crease the dot right down the center. You can use a poker to pull the ends up into a smile, pull them down into a frown or leave them alone. And there you have it! A simplistic way to create a fish bead.
Tuesday, March 31, 2009
Safety First
If you've been drawn to the flame, chances are you've had some really 'DUH" moments. Moments that have disaster written all over them. I'm sharing with you some of my Duh moments in hopes that you'll avoid them yourself.
- If you are using a c-clamp to hold your torch to your work table, periodic checks to ensure the clamp is secure is a must!
It goes without saying that safety is first and foremost the biggest concern. Sometimes I get too complacent and forget to do a mental check list. Ensuring that my torch is securely adhered to the table is the first thing I check now. A couple of months ago, my c-clamp had worked itself loose and had fallen back on me while lit. I was lucky that my reflexes where quick that day. Of course when being chased by a flame, I think all of our reflexes kick into over-drive. I wasn't hurt/burned but it could have ended bad. This incident was by far the scariest thing that I've encountered since lighting the torch the first time.
- Never wear a brimmed hat while at the torch.
It's hard to judge the distance from something on top of your head to the flame. I lost my favorite hat by sticking the brim in the flame and catching it on fire.
- Never scratch your head with the end of a glass rod.
Often times, while at the torch, I find myself in need of an extra pair of hands. Inevitably something will start to itch (nose, neck, head, etc.). With a mandrel in one hand and a glass rod in the other the logical choice would be to use the glass rod because the other is, well..... hot. Do not use the glass rod. It's sharp! I've done this a total of 3 times (hopefully the third time was the charm) every time ended with blood trickling down my neck. Okay, one time I scratched my nose, but that's too embarrassing to mention here.
- Always wear non-flammable clothing.
Cold glass is shocky when introduced to a hot flame. Glass chips fly off and is extremely hot and has the potential to catch things on fire. Those chips can also find their way inside clothing or shoes. Tank tops and flip flops are not a good thing in the studio.
- Chairs with wheels are a good thing.
Although not a requirement, having wheels on the chair you sit in is a good idea. It makes for easy escape should a bead or hot glass find it's way in your lap.
- If you smell something burning, check that it's not you.
This is the mantra in my studio. Often times I'll wake up, grab a cup of coffee and head to the studio in my pajama's without bothering to comb my hair. The "rat's nest" that has formed on the side and back of my head while sleeping, is a disaster waiting to happen. It's a catch all for slivers of hot molten glass. You'll smell it before you feel it. Never let the smell of burning hair go unheeded. It will turn a bad hair day into a bad hair month!
Sunday, March 29, 2009
“The sun will come out tomorrow”

After blizzard like conditions on Friday. The sun has reappeared melting snow and re-opening roads. Although we needed the moisture. I would have preferred a good soaking rain over the snow. But I guess we don’t get to chose. We haven’t seen this much snow in a long time. The kids got a snow day and are now enjoying the building of the snowmen. Little families are popping up all over the community.
Friday, March 27, 2009
Storm of the Century

Some time during the night a blizzard rolled in. Our nice spring like weather disappearing. Temperatures plummeted into the 20's with a wind chill of 0 and the wind gusting up to 50 mph.
Schools, Post Office and all roads leading into and out of my town are closed. My kids have not had a snow day for 6 years!
The thing about living in the Texas Panhandle is "If you don't like the weather, wait a couple of hours and it will change." Conditions can look like this one minute and clear up the next. According to the local weather station. By Sunday we should be in the 60's. 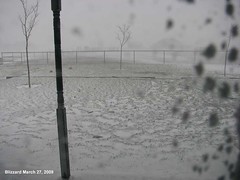
Looks like today will be a lazy day. I've got a fire in the fire place, a big pot of beans and cornbread on the stove and enough hot chocolate to last until the storm breaks. Life is good!
Wednesday, March 25, 2009
Still Waters
It's been a tough couple of weeks being in a slump. My muse took a vacation right when business had picked up a bit. But I think she's shown back up. I'm glad she did. It's so frustrating not being able to create beads you're happy with. Hopefully, I'm out of my slump.
I used light and dark turquoise and light and medium gray for this set. This morning I decided to etch it. In hindsight, I wish I wouldn't have, but the effect is still pretty nice. It muted the colors a bit more than I had anticipated. But I do love the feel of etched beads.
Thursday, March 19, 2009
One of those days!
Some days it just doesn't pay to get out of bed! Yesterday morning I got the kitchen cleaned, took some pictures, posted on my blog then headed to the studio. This was my first mistake. I should have just stayed in bed.
I had worked on a new bead style, using a cone mandrel I had purchased and was anxious to see how it turned out. It turned out great until I went to remove it from the mandrel. Grrr! I had inadvertently wound the glass on the bottom of the cone mandrel, so of course the bead wouldn't come off. Okay, lesson learned. I chipped the bead off and chalked it up as a stupid mistake. A mistake that I spent 30 minutes on.
The previous day I had made a set of beads using what I thought would be spring colors. Peach, violet and green. I've used the peach color before, several times, in fact and it has always yielded a very light peachy color. Well, I guess the moon and stars were not lined up in my favor because what came out of the kiln was not what I had hoped for. Not even close to what I expected. The same glass I have used countless times before came out of the kiln a deep, dark Orange! Really? Now, I know that different flame chemistry will produce different colors in some glass, but I hadn't done anything differently. Why now? Okay, so I don't have a spring set, I have a Halloween set. Whatever. At this point in my day, I'm really trying to be optimistic. So, I'll chalk another one up and be happy that I've got a jump on my Fall beads.
Not even close to what I expected. The same glass I have used countless times before came out of the kiln a deep, dark Orange! Really? Now, I know that different flame chemistry will produce different colors in some glass, but I hadn't done anything differently. Why now? Okay, so I don't have a spring set, I have a Halloween set. Whatever. At this point in my day, I'm really trying to be optimistic. So, I'll chalk another one up and be happy that I've got a jump on my Fall beads.On to another task. I need to clean some beads. Yeah, well not going to happen, as my diamond bit decides to lose all of the diamond coating. I've used those same brand of bits for over 2 years now. Never had a problem before. To top it off, it was my last 1/16" bit too. Now I'll have to make a trip to the store to get some. I figure this will have to wait because quite frankly the way my day was going I was afraid to get behind the wheel.
I'll admit at this point my optimism is really starting to wain but I'll plow through it. I fire up the torch and make some beads. I'm in the zone, life is good again and I'm on a roll. About the time I finish my 9th bead and go to put it in the kiln, I realize I never turned the kiln on! Yep all 9 beads lost. No more optimism here. I'm calling it a day. The only silver lining on that day? I still had 1/2 a quart of Moollennium Crunch ice cream in the freezer.
Wednesday, March 18, 2009
Sweet Pea

What a week! As you can tell by my post dates, I broke my promise to post daily. I'm finding it increasingly difficult to find enough time in the day to do every thing I've committed myself to do. Talk about a full plate.
After playing catch up on my previous obligations. I manage to make it to the studio the day Mother Nature decided we were not finished with winter and dumped 2 inches of snow on us. Of course, the next day the sun came out, the temperatures rose and nary a trace of snow was left.
My love affair with pink continues in this set. Accented with a bit of pea green and white, I present Sweet Pea. Hopefully I'll have it on Etsy by this evening.
Wednesday, March 11, 2009
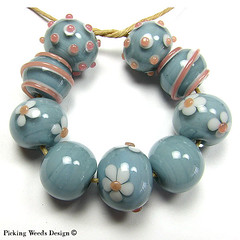
Wild & Blue

Inspired by the leopard and my desire to use bright colors. I created this set using vetrofond pajama blue and ASK tribal turquoise. The spacers are effetre black.
I've never really been fond of animal prints but I did enjoy making these. I'm not sure I would have tried had it not been for the suggestion of my son's friend. In fact, I think I'll explore it further in different colors. I'll be listing these on Etsy this evening.
Tuesday, March 10, 2009
10 Useless Facts
I think the reason it took me so long to jump on the blog bandwagon is because I find it extremely hard to write about myself and my work. Of course this mentality is not a good thing if you're goal is to have a thriving business. I'm going to step outside of my comfort zone and divulge 10 things about myself. Totally useless and probably of no interest, but it will serve two purposes: (1) Keep my blog updated, as I promised myself I would. (2) Over-come my social limitations, which is cheaper than counseling.
- I'm a contradiction in terms: I collect cookbooks but hate to cook. I enjoy looking at jewelry but never wear any. I like gardening/flowers but can't grow anything.
- I hate being the center of attention. Yet, I'm such a klutz and the most embarrassing things happen to me that more times than not, I am.
- I'm 5'11" and was the tallest girl in elementary and junior high.
- I've only flown in a plane 4 times.
- I've never seen an animal give birth in real life. (Talk about useless facts!)
- I have no sense of direction and get lost in the town I've lived in all my life.
- My secret dream, as a child, was to be a farmer when I grew up. (Just plain weird, I know.)
- I'm an only child.
- I married my High School sweetheart. Still happily married.
- Pink is my favorite color.
That was harder than I thought. But it did serve it's purpose for the day. Hopefully by tomorrow I'll have something better to post. Off to the studio!
Monday, March 9, 2009
Stone Washed
Ever so often I get lucky and discover a new color. That's not to say it hasn't been discovered before. In fact, more times than not, when I've created something I feel is so unique and couldn't possibly be thought of by anyone else. I'll find down the road that it's already been done. A bit disheartening but one of these days I'll find that special technique, style or color that's yet to be discovered.
But I digress. I actually discovered the base color in the pictured beads quite by accident. More out of necessity than logical thinking. I had ran out of clear glass and my order had not arrived at the making of these beads. I wanted the depth that encased opaque glass has to offer, so what to do? I had a couple rods of CIM Glacier that I wanted to work with but no clear to encase with. I didn't really like the look of glacier when I encased it with the transparent blues I have, so I grab a rod of transparent light gray and tried it. Bingo! The color reminds me of my favorite pair of jeans. The jeans that really are not fit to be worn in public but are just too comfortable to throw out. The jeans that are the epitome of "What NOT to Wear" but fit in all the right places and don't bind in the wrong ones. Let's face it. We all have a pair of those jeans. Now you can accessorize them! I accented these beads with pearl gray. That matches the threads fraying around the holes. I added a touch of Carnelian here and there. That will accent the skin peeking out of those holes. What more could a girl want?
Friday, March 6, 2009
Hurry Up Spring
The unseasonably warm weather we've been having across the Texas Panhandle has given me a bad case of Spring Fever. Temperatures in the high 70's and low 80's have been wonderful. Of course by the weekend temperatures drop back down to the normal 50's & 60's.
I'm tired of the bulky sweaters and wool socks, the drab landscape and being confined indoors. Bring on the green sprouts of grass and vibrant colors of newly budded flowers! If I'm not asking too much, some rain to relieve this 2 year drought would be nice too.
I dedicate this set to Mother Nature, hoping she's as impatient as I am and will........Hurry up Spring!
Thursday, March 5, 2009
Pool Side
Inspiration can come from the most unlikely places. While shopping with my daughter at our local mall. I ran across a little brown eyed girl. She looked to be about 6 years old. She was dressed in the cutest light blue gingham dress with flower appliqués across her collar. Her hair was pulled up in little pig tails that curled to her shoulders. She was cute as a button!
Now, when you have a daughter that is 13 going on 30. It makes a Mother's heart ache to turn back time and have that sweet innocence in your own child back again. Back to a time when you could pick out her clothes and there was no argument that it wasn't "cool". You see very little sweetness with a teenage girl. A teenage girl that wants to wear the tight pants and mid drift shirts (over my dead body!) A teenage daughter that rebels when Mom suggests long sleeves, high collars, knee socks and Mary Jane's are the perfect outfit for the Sweetheart Dance.
In the end we compromised. Not too much skin showed and she was still cool. But, as I watched her walking to the gym for the dance. I couldn't help but think back to that little girl and how I wished that my own daughter would come running back and crawl up on my lap and snuggle like we did when she was little.
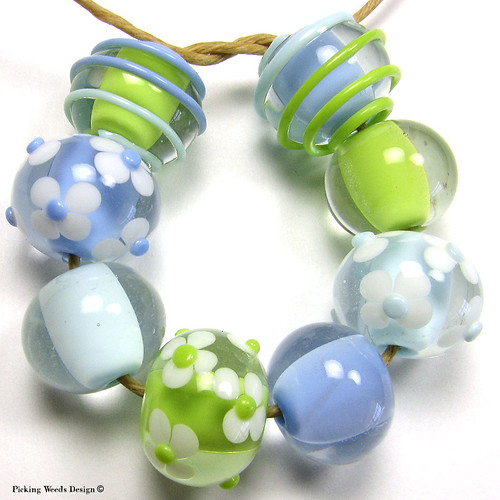
And that was my inspiration for this simple set of beads. I used the color scheme of sky blue, pea green and periwinkle. I encased each bead in clear and added surface decorations to some. You can find this set of beads for purchase in my Etsy store.
Wednesday, March 4, 2009
Studio Tour
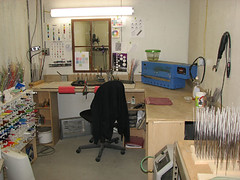 Originally my "studio" was where ever I could find a place in the barn. I soon realized this would not work. I like my things clean and organized, my husband? Not so much.
I really needed a space of my own. One Christmas my husband asked what I wanted. Normally, I say nothing but this year I really wanted a studio. Being lucky enough to have a husband that indulges me, that's exactly what I got!
Times are tough for everyone and we were no exception. We had to build on a very limited budget and we did. In total, I think we spent less than $300.
Since my studio is a room inside of an existing building (our barn) I only need two walls. The material for the walls we already had. The only out of pocket expenses were ventilation, paint, base cabinets and counter tops. We pooled all of our gift cards together and was able to purchase most of those things at a surplus store or on sale at Lowes.
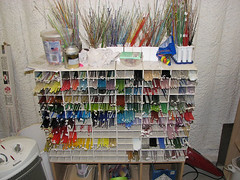 My glass storage came a bit later. I was lucky enough to find the vinyl fence post on clearance at Lowes. They were a discontinued item and marked down to $3.50 a picket. I simply cut the pickets into 12" sections and stacked them on top of each other. Gorilla glue is a wonderful thing! My husband added a backing so the glass doesn't fall out the back.
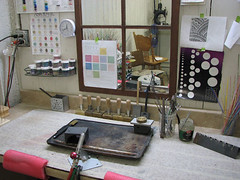
While I started out on a hothead, I soon found I had very little patience for it and upgraded to a Nortel Minor. I am very happy that I did. It works like a charm.
You'll notice a mirror in front of my torch. I assure you that is not for vanity purposes. My husband, kids and friends think it's very funny to sneak up on me since the door is to my back. With the mirror, I have a little warning.
My pink arm rest are actually water noodles. They were inexpensive and do a fine job.
So there you have it. A glimpse into my studio. A bit drab and I really wished I had a window. It's not exactly my dream studio, but when you're on a budget, beggars can't be choosers. Or something like that. One of these days I'll fix it up and add more color. As it stands, I spend every minute I can at the torch. Lampworking really is an addictive medium, everything else falls to the wayside.
Subscribe to:
Posts (Atom)


