Monday, June 29, 2009

Lovin' Murrini!

There are so many things you can incorporate into your bead design: dichroic, leaf and foils (copper, silver, gold, etc.), metal mesh, mica, frit, murrini......well you get the picture. I've tried some of these things in the past with mixed results and feelings. Nothing has really given me that OMG! moment. Ya' Know?

A couple of years ago I had purchased a mixed murrini sample pack off of Ebay. Gotta say I was not impressed in the least. While the chips looks pretty in the container, not so much when I used them in a bead. They bled or devitrified. No matter how I worked them. So on my shelf they sat. I wasn't too enthusiastic on trying any more.

Now I'll admit I'm a sucker for pretty packaging. A big sucker. I've purchased the most horrible tasting fudge because it came in a cute tin with a pink and green bow (my favorite colors). I've bought books that were a complete waste of paper because I liked the dust jacket. I've bought pajama's two sized too small because I liked the bag it came in. I've bought the ugliest glass because it had "pink" in the name. Where am I going with this, you ask?

Okay, I'll get to the point. A while back a fellow bead maker announced her line of Murrini. I was really tempted for a couple of reasons. The over-all presentation. I was really drawn to the pictures/packaging. The second reason? It was glass! I was also very hesitant because of my past experience and I didn't want to sink any money into something I wouldn't like.
Eventually I was tempted enough to make my first purchase and boy am I glad I did! Noting but rave reviews for this murrini and finally my OMG moment!

Renee Wiggins with Jet Age Studio has amazing murrini blends that will NOT disappoint.

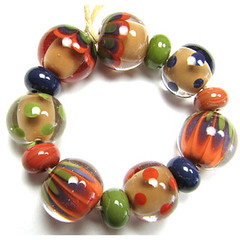
In this first set, I used her Silky Sand blend. I started with a base of Effetre Avacado thickly encased in clear. Using the murrini as the main focus of the bead, I added lines and dots in complimentary blue, green and browns.

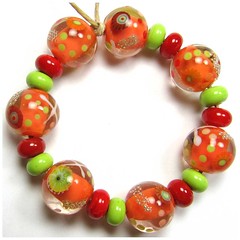
This second set features the Citron Blend. I started off with a base of Vetrofond Poppy encased in clear. Added the murrini and lines and dots in green, white, red and a bit of fine silver mesh here and there.

Saturday, June 27, 2009

Zingiber

Zingiber- Gold beehive ginger is erect, from 6-8 feet tall, and the inflorescences are basal. The bracts are a golden copper color, becoming reddish as it matures, especially if it gets some full sun. All parts of the plant have a strong gingery fragrance. Attractive in the garden and as a cut flower. Blooms from July through November. Propagated by division, stem cuttings and seeds.

After awhile it get very hard to think of names for a bead set your listing. Especially for me. I seem to go into a total blank state when it comes to naming my set. Most of the time, I'm sure the name has nothing to do with the set, as with this one. During a recent google search, I came across the beautiful flowering ginger plant Zingiber. While this set looks nothing like the flower linked above, it's such a pretty flower and well the name is kind of fun to say.

I used new colors produced by Creation is Messy: Tamarind, Olive and Lapis. And a coral from Effetre. I'm not sure what the name for the coral is but it really looks like tomato soup to me. It's a nice reddish orange.

The two beads I most like in this set are the petal beads. Made using a technique taught by Amy Trescott. She makes the most amazing bead. I'm so glad she shared her technique in tutorial form.

Friday, June 26, 2009

Rainbow Sherbet


There are two things that are always at the top of our grocery list. Neapolitan ice cream and rainbow sherbet. We'll run out of toilet paper before we let our ice cream supply get low!

This set recently add to my Etsy store was inspired by the soft swirly colors of Rainbow sherbet. I've used a orangy-peachy-pink tinted version of Effetre coral as the base. Pea green and raspberry pink set off the coral so nicely.

This version of rainbow sherbet would go nice around your neck or wrist and never settles around your hips!

Thursday, June 25, 2009

Brown Bear Tutorial

Not too long ago, I ran out of propane and my regular supplier was too busy to fill my tank. Needless to say he lost my business for good. Looking in my phone book for another place to get my tank filled, that was close to my home, I found Fort RV Park. I'm so glad I did! Located in the park and where I had to go in to pay for my propane; was Lizzie Mae's. Now I'm not much of a shopper so for me to say I love a store says a lot. This place not only has great home decor, the building and fixtures are wonderful and rustic. It just a comfortable place that you can literally spend hours browsing through. Anyway, my point in telling you this, is some of the things they have for sale is black bears. Wooden, resin, ceramic...you get the picture. So I'm standing there staring at these cute little creatures and the light bulb goes on over my head. This doesn't happen very often. So I go home with my newly filled propane and set to work making a black bear in glass. I work backwards, meaning I try the hardest things first and when they fail (and fail miserably) I then simplify my work. So I thought I'd share my simplified version of a black bear in glass.


  1. Make a straight sided lentil with my Zoozii's press using black.
  2. Two dollops of glass on each side of the mandrel for ears, using black.
  3. Build the eyes: White pressed flat and half-way melted in. Clear left raised. Small dot of black for the pupil, melted flat.


4. Add two dollops of brown for the cheeks.

5. Add two small dots of brown on the ears.

6. Add small dot of black in the top-center of the brown cheeks for the nose.