
 I have never been one who could put pencil to paper and draw realistic images. Even my stick people are pitiful. It is even more difficult when using glass as you do not have the erase option. Once I realised
  every thing is just basic shapes IE. circles, squares, and triangles. It was easier for me to make animals. By no means are my animals realistic but that's okay. I actually prefer to make the "cutesy" style. And by varying the eyes and mouth you can give your fish several different expressions.
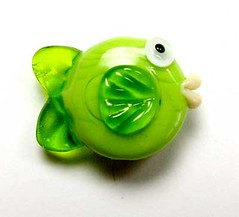
In order to get a crisp round body shape. I use a glass press I purchased from Zoozii's. I like the straight sided lentil (spree) press. It creates a flattened round bead that is thick enough to decorate the sides. This will be the body of your fish. You can use either a transparent or opaque color of your choice. For the fish pictured above. I used the smallest cavity of my press, which makes a base bead of 13mm x 6mm.
 Once the body of the fish is made. I add the side fins. I use a 5-7mm sized rod and heat a small gather on the end. I place the dot off center and closer to the front. You'll need to do this on both sides of the body, making sure the dot is positioned in the same place on both sides. For the back fins, heat a gather and place one dot above center and the other below. You want these dots close together, but not touching.
 The next step is the eyes. These can be made several different ways. I prefer to layer white, clear and a dot of black for the pupil. Using a stringer place a small dot of white on both sides of the body. You can place the eyes where ever it suits you. I prefer the very edge of the body and close to the mandrel. Flatten this white dot but do not melt in. Place a small dot of clear over the white and flatten. Then place an even smaller dot of black over the clear. I push the black into the clear with a small spatula then slowly heat the eyes to round them back out, making sure not to heat them too much. You want the eyes to remained slightly raised.

Once the body of the fish is made. I add the side fins. I use a 5-7mm sized rod and heat a small gather on the end. I place the dot off center and closer to the front. You'll need to do this on both sides of the body, making sure the dot is positioned in the same place on both sides. For the back fins, heat a gather and place one dot above center and the other below. You want these dots close together, but not touching. Now you'll need to shape all of the fins. To shape the side fins on the body. I use an exacto knife to crease the raised dot down the center and then on each side. You'll want to direct your flame only on the raised dot and not the body. We want that dot to remain raised. The final touch is pulling the front half of the fin into a point or a triangle. I use an old mandrel that I ground down to a fine point but any poking tool will work.
on the raised dot and not the body. We want that dot to remain raised. The final touch is pulling the front half of the fin into a point or a triangle. I use an old mandrel that I ground down to a fine point but any poking tool will work.To shape the back fins. I soften the glass in the flame and use tweezers to squeeze and center them up. When you squeeze the glass it will drawl the dots closer together. You can either use a stringer to pull them into points or use your tweezers to ruffle them. Either way looks good.
The next step is the eyes. These can be made several different ways. I prefer to layer white, clear and a dot of black for the pupil. Using a stringer place a small dot of white on both sides of the body. You can place the eyes where ever it suits you. I prefer the very edge of the body and close to the mandrel. Flatten this white dot but do not melt in. Place a small dot of clear over the white and flatten. Then place an even smaller dot of black over the clear. I push the black into the clear with a small spatula then slowly heat the eyes to round them back out, making sure not to heat them too much. You want the eyes to remained slightly raised.The final step is the lips. Using a stringer of your color choice, place a raised dot on the flat end of the bead. Using an exacto knife crease the dot right down the center. You can use a poker to pull the ends up into a smile, pull them down into a frown or leave them alone. And there you have it! A simplistic way to create a fish bead.


I love the fish!! And one of my favorite colors too! Your shop is amazing.
ReplyDeleteThank you Audrey!
ReplyDelete